시작하기전에
서비스를 고객에게 제공할때 응답 속도는 고려해야할 중요한 지표 중 하나입니다.
Google은 “모바일 고객의 53%가 3초이내에 페이지가 로드되지 않는다면, 해당 서비스를 이용하지 않는다”(https://www.soasta.com/blog/google-mobile-web-performance-study/) 라는 결과를 언급하기도 했는데요, 서비스 제공에 있어 응답 속도의 중요하다는 한 예가 될것 같습니다.
응답 속도를 높이기 위해 데이터 조회에 관련된 로직을 캐싱 처리하는 것도 한가지 방법이 될 수 있습니다.
이번 기고는에서 Redis를 이용한 캐싱 엔진 구축하기를 기술해보겠습니다.
Redis 간단 설명
Redis는 대표적인 인메모리 Key-Value 스토어 데이터 베이스로 String, Hash, Set 등의 다양한 Data Structure를 제공합니다.
특히 Redis는 매우 빠른 액세스 속도로 인프라간 오버헤드를 줄여주기때문에, 서비스의 성능 향상을 위해 많이 사용됩니다. 타 데이터베이스와 비교하였을때 Redis의 응답 성능은 매우 우수한 수준임을 확인해볼 수 있습니다.
[그림. SQL과 NoSQL의 응답 성능 비교]
https://redislabs.com/blog/the-proven-redis-performance/
구현 목표
이번 기고에서 적용해 볼 서비스와 스펙은 다음과 같습니다.
OS: CentOS 7.3 (64bit)
Platform: Node 8
DB: Redis
서비스: Ncloud Geolocation으로 사용자 위치 표시
캐시: 특정 key에 대한 value 반환. 설정한 TTL후 캐시 자동삭제
제공할 서비스: 사용자 IP를 획득하고 Ncloud Geolocation을 통해 위치를 알아낸 뒤 이를 웹페이지에 표시
IP에 따른 위치는 자주 바뀌는 값이 아니므로, 이를 캐시에 저장해놓고 사용한다면
빠른 응답성을 추구하는것과 동시에 불필요하게 Geolocation API를 많이 호출하는 문제 또한 줄일 수 있습니다 ^^
구현에 앞서 Ncloud Redis를 신청하는 방법을 알아보겠습니다.
Ncloud Redis 신청하기
Redis는 Ncloud에서 Cloud DB for Redis 라는 이름으로 서비스 되고 있습니다. 아래의 그림과 같이 간단한 입력만으로
접속 정보 및 고가용성 구축을 쉽게 설정할 수있도록 지원하고 있습니다.
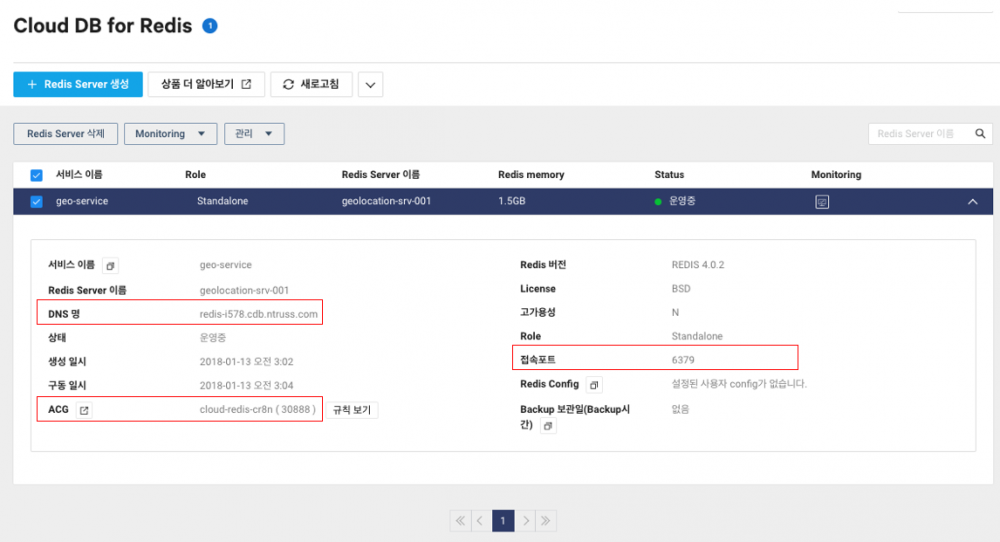
[그림. Cloud DB for Redis 에서 Redis Server 생성]

Redis Server 메뉴에서 생성된 DB를 확인할 수 있습니다.
DNS명과 접속포트가 각각 우리 서버에서 DB접근시 사용될 Redis Client의 host와 port값에 해당합니다.
다음으로 남은 절차는 ACG를 설정입니다. 우리의 서버에서 이 생성된 DB에 접근을 하기 위해서는 ACG의 접근 소스에 등록해주는 절차가 필요합니다.
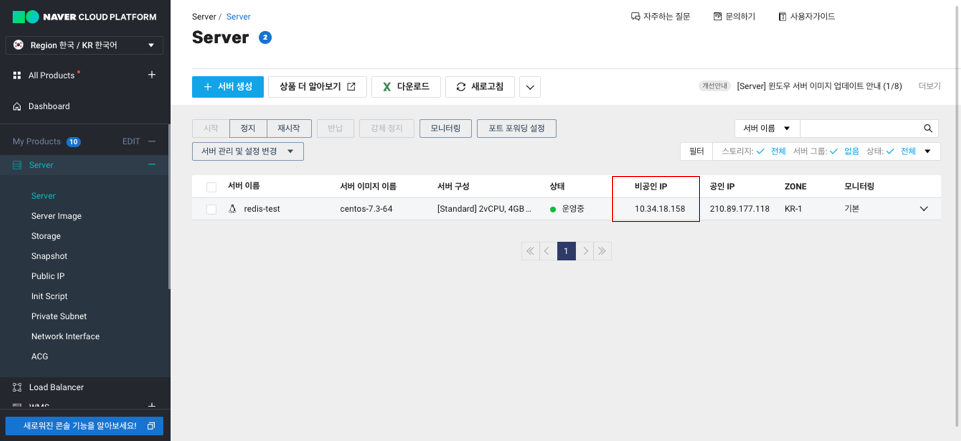
접근 소스는 서버의 비공인 아이피 입니다. Server > Server 메뉴에서 DB에 접근하고자 하는 서버의 비공인 IP를 확인합니다.
ACG 메뉴로 이동하여 생성한 Redis DB의 ACG에서 아래와 같이 서버의 비공인 아이피를 입력하여 접근 소스를 입력해줍니다.

이제 서버에서 Redis DB에 접근이 가능합니다 ^^
이를 이용하여 캐시 시스템을 구축하면 되겠습니다.
Redis를 이용한 캐시 시스템 구축 구현
Redis 이용 모듈 작성
Redis 모듈은 Node.js에서 싱글톤으로 많이 사용됩니다. 싱글톤 패턴은 간단히 말해 하나의 프린터를 두고, 여러대의 컴퓨터가 공유하는 예와 유사합니다. 서버 시작 시 connect() 함수를 실행하여 Redis Client를 생성하고, 그 생성된 Client를 다른 모듈에서 사용하는 형태로 이용하면 되겠습니다.
1 | const Redis = require('ioredis'); |
Ncloud Geolocation 모듈 작성
Ncloud의 Geolocation 서비스를 Node.js에서 이용하기 위해, 이미 공개되어 있는 ncloud package(https://www.npmjs.com/package/ncloud)를 이용하였습니다. getLocation함수로 이를 wrapping하여 사용하도록 의도하였으며, 함수 호출전 ipv6에서 ipv4의 주소 공간 변경을 위해서, ipv6에서 ipv4의 주소 매핑을 위해 사용되는 prefix 인 ::ffff:를 제거합니다. 주소 공간에 대해서는 https://ko.wikipedia.org/wiki/IPv6 의 특수 주소 공간을 참조하세요.
1 | const ncloud = require('ncloud'); |
캐시 모듈 작성
캐시 모듈는 범용적으로 사용할 수 있도록, 함수와 캐시의 TTL를 등록하여 사용하는 형태로 작성합니다.
함수 호출시 캐시 모듈은 함수 호출 인자들을 key로 이용하여 redis에 해당 key로 된 value가 있는지 찾습니다.
값이 있는 경우에는 이 value를 반환합니다.
값이 없는 경우에는 함수를 실행하여 결과 값을 반환 받고, Redis에 이값을 SETEX 명령을 통해 등록과 동시에 TTL을 설정합니다.
Redis의 명령은 다음을 참고하세요.
SETEX: https://redis.io/commands/setex
GET: https://redis.io/commands/get
EXISTS: https://redis.io/commands/exists
1 | const redisClient = require('../redis'); |
메인함수 작성
메인 함수에서는 지금까지 작성한 모듈들을 이용해줍니다 ^^
redisClient.connect()를 통해서, 사용할 redis client를 생성합니다.
앞서 작성한 memoization 모듈(캐시 모듈)을 이용하여, geolocationApi를 wrapping해줍니다.
API 서버 구축을 위해 express 모듈을 사용하였습니다.
GET /user/gelocation 의 path로 접근하여, geolocation의 결과물을 확인할 수 있겠습니다.
1 | require('dotenv').config(); |
서버에 공인 ip를 부여 후 /user/gelocation 의 path에 접근합니다.
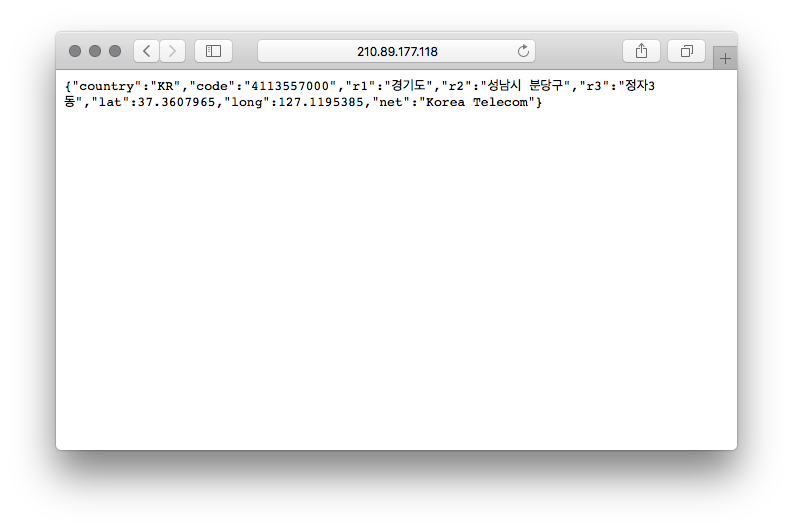
geolocation의 결과가 도출된 것을 볼 수 있네요. 앞서 콘솔 메시지로 캐시가 생성되면 “Create Cache”, 캐시가 있으면 “Cache Hit” 메시지를
출력하도록 구성하였습니다. 웹 브라우저를 새로고침을 여러번 시도하여 캐싱 로직이 동작하는지 확인해봅시다.
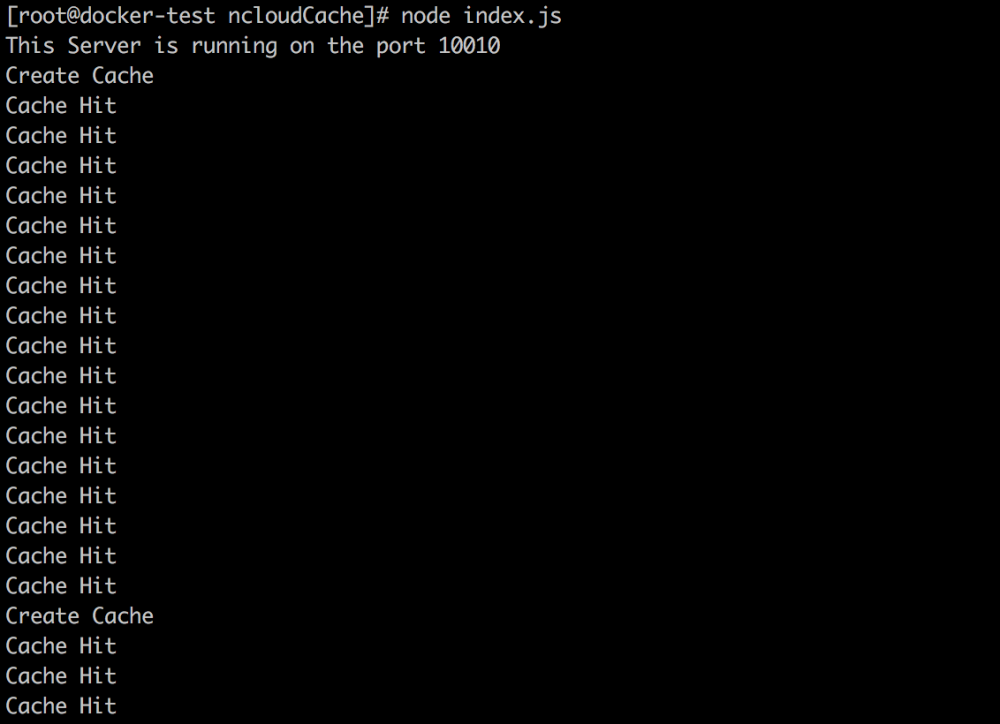
처음 Cache가 생성 후, 이후 새로 고침에서는 Cache를 사용하는것을 확인할 수 있습니다. 이후 TTL이 지나 Cache가 만료되어 삭제된 후에는
새롭게 캐시를 생성하는것을 확인할 수 있습니다 ^^
성능 테스트
Redis 캐시를 적용했을 때와 미적용했을 때의 성능 비교를 해보겠습니다.
이를 위해서 성능 특정 도구가 필요한데요, npm package인 loadtest(https://www.npmjs.com/package/loadtest)라는 것을 이용할 수 있습니다.
간단한 명령어로 동시 사용자수, 지속시간, 초당 request 수(requests per second)를 설정할 수 있으며 이 조건하에 API 의 성능을 테스트 할 수 있습니다.
20초동안 10명의 유저가 초당 10회로 명령을 주었을 때의 성능 데이터를 수집해보겠습니다.
API의 성능 지표로 mean latency를 많이 사용합니다. 이 값이 낮을 수록 빠르게 결과값을 수신하였다는 의미로 해석하면 됩니다.
1 | $ loadtest http://<구축한 API 서버 주소>/user/geolocation -t 20 -c 10 --rps 10 |
캐시 적용전
1 | INFO Requests: 0, requests per second: 0, mean latency: 0 ms |
캐시 적용 후
1 | INFO Requests: 0, requests per second: 0, mean latency: 0 ms |
해당 API 수행 결과에서 캐시 적용전 평균 40.1 ms의 수행시간이 걸린 것에 비해, 캐시 적용 후에는 13.5 ms로 성능 향상을 확인 할 수 있네요^^
이번 기고에서 작성된 예제는 https://github.com/mosfet1kg/ncloudCache 에서 확인할 수 있습니다.
国内查看评论需要代理~